Whitelisting an Email Address. The easy way.
A lot of content that you want and subscribe to is sent to your spam or promotions folders and you never see what you asked for. So I have created this super simple short and easy way to whitelist those important emails that you really want to read.
First, keep in mind every email provider is different, so I have instructions on how to whitelist with the most popular ones.
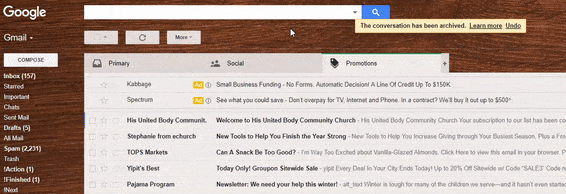
Gmail
If you’re using Gmail, it’s super easy. Right after you subscribe to what you want – Find the email in the “Promotions” tab, then just drag the mail to your “Primary” tab. Click Yes on “Do this for future messages…” and you are done.
Outlook Mail
Right-click on the email. Move your mouse pointer to “Junk E-mail” and click “Add Sender to Safe Senders List.”
Yahoo! Mail
After you open an email, there’s a plus sign (‘+’) right next to the sender’s name. Just click this, and then click “Add to Contacts”.
Mail for Mac
Select “Mail”, then “Preferences”, then “Rules”, then “Add Rules”, then add the email address. Now select “Move message to inbox”, and click save.
Important Note: When you whitelist an email, it usually does not apply to past emails that are already in the Spam or Trash folder. In that case, you will need to search with the email address and bulk rescue your past emails.


